🩸 The Role of the Phlebotomist
You are the first clinical touch. Understand who you are, what you do, and why it matters.

🩸 What Is a Phlebotomist — Definition & Scope of Practice
A phlebotomist is a trained healthcare professional whose primary responsibility is collecting blood and other specimens for laboratory analysis. The word comes from the Greek phlebo (vein) and tomia (cutting) — literally, "one who cuts the vein." In modern practice, this means skilled venipuncture, capillary puncture, and specimen handling under physician or practitioner orders.
Phlebotomists work within scope of practice — a legally defined boundary of what they are and are not permitted to do. A phlebotomist may collect specimens, verify patient identity, process and transport samples, and document collection data. They may not interpret test results, diagnose conditions, prescribe treatment, or administer medications (unless additionally certified). Staying within scope protects you legally and protects patients clinically.
Phlebotomists are credentialed through national organizations: the NHA (National Healthcareer Association) offers the CPT (Certified Phlebotomy Technician) credential, and the ASCP (American Society for Clinical Pathology) offers the PBT (Phlebotomy Technician) certification. In Arizona and most states, certification is required for employment in accredited facilities.
📊 The 70% Statistic — Why Your Work Drives Medicine
This single statistic defines why phlebotomy is critical in healthcare. A doctor ordering a CBC (Complete Blood Count), metabolic panel, lipid panel, or blood culture is not just ordering a test — they are trusting you to have collected the right amount, in the right tube, at the right time, with the right patient identity confirmed, without hemolysis, contamination, or labeling errors.
When specimens are improperly collected, results can be:
- Falsely elevated — e.g., potassium rises sharply with hemolysis, leading to unnecessary cardiac intervention
- Falsely low — e.g., dilution from drawing above an IV line
- Contaminated — e.g., bacteria from the skin causing false-positive blood cultures
- Rejected — wrong tube, insufficient volume, wrong patient ID → repeat collection, patient discomfort, delayed treatment
🏢 Clinical Laboratory Structure — Where Your Specimens Go
The clinical laboratory is organized into specialized departments, each processing different specimen types and test panels:
| Department | What It Tests | Common Tests |
|---|---|---|
| Clinical Chemistry | Blood chemistries, enzymes, hormones | BMP, CMP, lipid panel, liver function, HbA1c |
| Hematology | Blood cell counts and morphology | CBC with differential, reticulocyte count, ESR |
| Coagulation | Clotting function | PT, PTT, INR, fibrinogen, D-dimer |
| Microbiology | Pathogens (bacteria, fungi, viruses) | Blood cultures, wound cultures, throat swabs |
| Immunology/Serology | Antibodies, immune markers | HIV, hepatitis panels, ANA, rheumatoid factor |
| Urinalysis | Urine composition and cells | UA dipstick, microscopy, urine culture |
| Blood Bank | Blood type, crossmatch, transfusion | Type & Screen, crossmatch, antibody ID |
| Molecular/Genetics | DNA, RNA, genetic testing | COVID PCR, flu PCR, STI panels, chromosomal studies |
Phlebotomists typically interact with most departments — especially Chemistry, Hematology, Coagulation, and Microbiology — because these require blood specimens you collect daily.
📋 Primary Duties — The Full Scope of Daily Work
A phlebotomist's daily responsibilities span technical skill, communication, documentation, and safety compliance:
- Patient identification: Two-identifier verification using name + DOB (or MRN). Non-negotiable before every draw. Wristband + verbal confirmation in inpatient; photo ID or verbal in outpatient.
- Order review: Verify the lab requisition — right tests, right patient, any special instructions (fasting, timed draws, chain of custody).
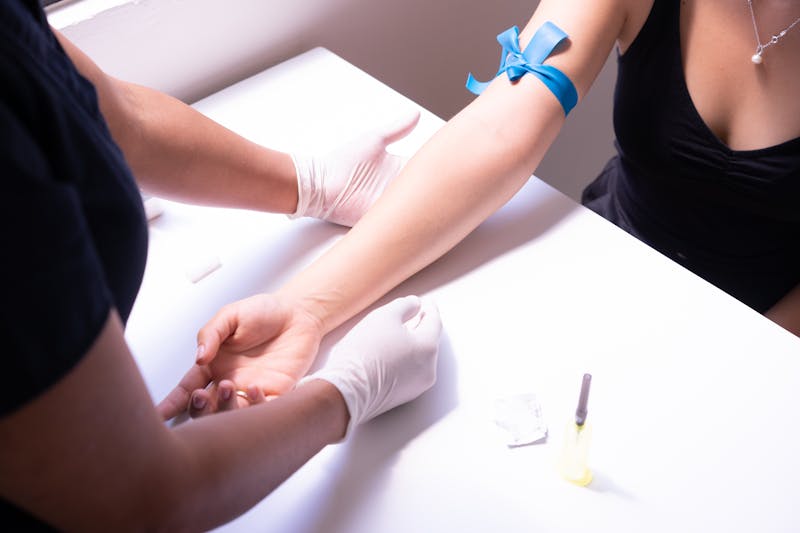
- Site selection & technique: Choose appropriate vein (median cubital first), apply tourniquet correctly (max 1 minute), perform venipuncture or capillary puncture.
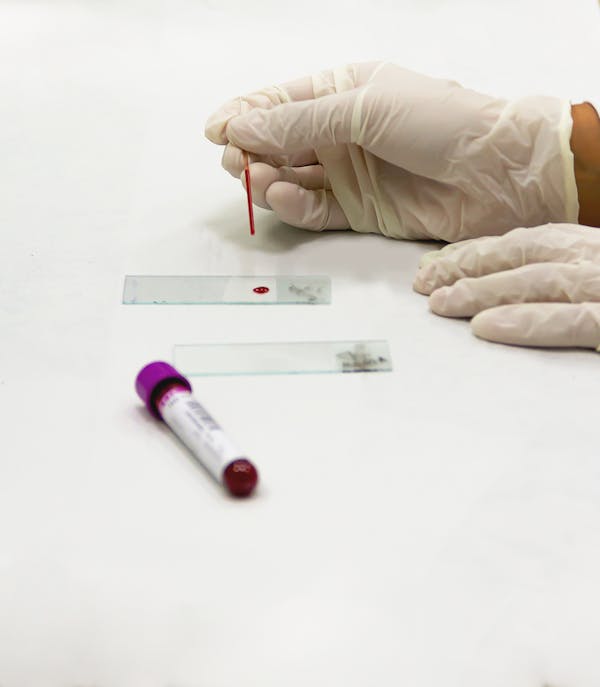
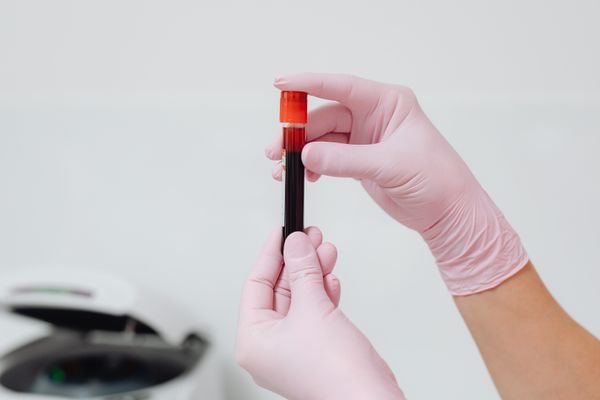
- Tube order & collection: Follow CLSI order of draw. Fill tubes to correct volume. Gently invert additived tubes the specified number of times.
- Specimen labeling: Label AT THE BEDSIDE, immediately after collection, with full patient identifiers. Never pre-label tubes.
- Processing & transport: Centrifuge specimens per protocol, separate serum/plasma when required, maintain temperature requirements during transport.
- Quality control records: Log collection times, document difficulties (multiple attempts, patient refusal, IV contamination), record reagent QC.
- Safety compliance: Follow OSHA bloodborne pathogen standards. Use safety-engineered devices. Proper PPE. Sharps disposal in approved containers only.
- Chain of custody: For forensic, drug testing, and legal specimens — documented, witnessed, sealed, tamper-evident from collection through analysis.
🏥 Employment Settings — Where Phlebotomists Work
Phlebotomists are employed across the full spectrum of healthcare delivery:
Hospital inpatient settings provide the broadest exposure — drawing patients on medical/surgical floors, ICUs, pediatric wards, oncology units, and emergency departments. Inpatient phlebotomists often work early morning rounds (5–7am) when most stat and routine morning labs are ordered, and are on-call around the clock for urgent draws.
Reference laboratories (Quest Diagnostics, Labcorp, Sonora Quest in Arizona) are high-volume outpatient draw stations. Phlebotomists see 20–60+ patients per day in a fast-paced, production environment. Patient preparation counseling (fasting instructions, what to expect) is a large part of the role.
In Arizona specifically, major health systems employing phlebotomists include Banner Health, HonorHealth, Dignity Health, Valleywise Health, and Tucson Medical Center. The state's rapidly growing population (3rd fastest in the US) drives consistent demand.
🎓 Career Pathways — From CPT to Advanced Roles
Phlebotomy is an excellent entry point into clinical laboratory careers, with defined advancement pathways:
| Credential/Role | Education Required | Scope | Avg Salary (AZ) |
|---|---|---|---|
| CPT (NHA) Certified Phlebotomy Tech | High school + phlebotomy program (4–8 weeks) | Blood collection only | $17–$22/hr |
| PBT (ASCP) Phlebotomy Technician | High school + clinical hours + exam | Blood collection + basic processing | $18–$24/hr |
| MLT Medical Lab Technician | Associate degree (2 yr) + ASCP MLT exam | Testing across all lab departments | $25–$35/hr |
| MLS/MT Medical Lab Scientist | Bachelor's degree + ASCP MLS exam | Full lab operations + supervision | $35–$55/hr |
| Lab Supervisor/Manager | MLS + experience | Department management, QA oversight | $60K–$85K/yr |
Many working phlebotomists use the role as a bridge to nursing, physician assistant programs, or medical school, gaining direct patient contact and clinical experience while completing prerequisite coursework. The NHA CPT is widely recognized nationally and transfers across all 50 states.
Quick Knowledge Check
🎉 Complete Lesson 1
Mark this lesson complete to earn your XP and unlock Lesson 2.
⭐ Qualities of a Successful Phlebotomist
Technical skill is only part of the picture. The best phlebotomists have qualities that build trust and ensure patient safety.
⭐ The 5 Pillars of Excellence — Explained in Depth
Every successful phlebotomist operates on five foundational principles. These are not soft suggestions — they are professionally codified standards that distinguish competent practitioners from exceptional ones.
Pillar 1 — Technical Competency
Technical competency means mastery of venipuncture, capillary puncture, order of draw, tube selection, specimen processing, and equipment use. It is built through practice, not just study. In Arizona, NHA-CPT candidates must complete a minimum of 100 successful venipunctures before sitting for the exam. Competency is maintained through continuing education and demonstrated skill in clinical evaluations. It includes knowing when not to attempt a difficult draw and when to call for a more experienced colleague — that judgment is part of competency, not a failure of it.
Pillar 2 — Compassionate Communication
The needle is not the hardest part of phlebotomy — the patient interaction is. Fear, anxiety, needle phobia, language barriers, cognitive impairment, and cultural differences all intersect in the 3 minutes you spend with a patient. Compassionate communication means introducing yourself clearly, explaining what you're about to do, making eye contact (when culturally appropriate), listening to the patient's concerns, and adjusting your approach when needed. A phlebotomist who says "this will only hurt a little" and then proceeds without acknowledging a patient's visible fear has failed this pillar, even if the draw is technically perfect.
Pillar 3 — Attention to Detail
Laboratory medicine operates on a zero-defect standard for identifiers. The right patient, right tube, right time, right label — every time. Attention to detail is what prevents the wrong patient being labeled on the right tube (a catastrophic error), prevents adding the wrong additive tube, and catches physician orders that don't make clinical sense before the draw is done. This pillar also applies to documentation: times must be accurate, difficulties must be recorded, and QC must be logged.
Pillar 4 — Safety-First Mindset
Healthcare is an occupational hazard environment. Needlestick injuries, bloodborne pathogen exposures, chemical reagent hazards, and biohazard waste create real risk. A safety-first phlebotomist activates the needle shield before recapping (never two-handed recap), disposes in certified sharps containers, wears gloves on every draw, and performs hand hygiene before and after every patient contact. OSHA's Bloodborne Pathogens Standard is not optional — it is federal law, and violations result in employer citations and fines.
Pillar 5 — Efficiency Under Pressure
Morning rounds in a hospital mean a single phlebotomist may have 25–40 draws to complete before 7am so results are available for physician rounds. Outpatient draw stations have waiting room queues. Stat orders must be processed within defined turnaround times. Efficiency under pressure means organized tray setup, systematic patient workflow, knowing draw times for timed tests (cortisol, glucose tolerance, therapeutic drug monitoring), and staying calm when a draw is difficult, a patient becomes uncooperative, or equipment fails.
👔 Professional Standards — Appearance, Conduct & Ethics
Professionalism in phlebotomy is not just about how you dress — it encompasses your punctuality, language, interpersonal conduct, boundary maintenance, and ethical decision-making.
Professional Appearance: Most facilities require scrubs in approved colors/patterns, closed-toe shoes, hair pulled back (infection control), no excessive jewelry (infection risk and patient perception), and minimal/appropriate cologne or perfume (many patients are chemotherapy patients sensitive to scent). ID badge must be visible at all times. Lab coat or isolation gown as required per unit infection control policy.
Professional Conduct:
- Address patients by their preferred name and title (Mrs., Mr., etc.) — ask if unsure
- Knock before entering a room, even in a hospital
- Maintain patient dignity — close curtains/doors during the procedure
- Never discuss one patient's results in front of another patient (HIPAA)
- No personal phone use during patient encounters
- If a draw fails, acknowledge it calmly: "I need to try again — I apologize for the discomfort"
Boundary Maintenance: Phlebotomists sometimes develop rapport with patients they see regularly. Boundaries matter: do not share personal contact information, do not accept personal gifts beyond small tokens of appreciation, do not form personal relationships outside the clinical setting, and do not share information about patients even if a family member asks.
📜 Ethical Standards — Codes of Practice
The phlebotomy profession operates under formal ethical codes. The two most relevant are from ASPT (American Society of Phlebotomy Technicians) and ASCP (American Society for Clinical Pathology).
Core Ethical Principles in Phlebotomy:
- Patient Autonomy: Patients have the right to refuse specimen collection. Document refusal but do not force collection. Respect informed refusal.
- Beneficence: Act in the patient's best interest. If you notice a patient appears to be in distress beyond normal draw anxiety, alert nursing staff.
- Non-Maleficence: Do no harm. Excessive venipuncture attempts without escalation, or improper technique causing unnecessary injury, violates this principle.
- Justice: Every patient receives the same quality of care regardless of age, race, gender, insurance status, incarceration status, or diagnosis.
- Confidentiality: Patient information encountered during specimen collection (diagnoses visible on requisitions, conversations overheard) is strictly confidential. HIPAA applies to phlebotomists.
- Integrity: Never document a collection time you did not actually collect at. Never label a specimen you did not personally draw unless your facility's policy specifically permits witnessed relabeling. Document adverse events honestly.
🎓 Continuing Education & Certification Maintenance
A phlebotomy certification is not a one-time achievement — it requires maintenance to remain valid.
NHA CPT Recertification: Valid for 2 years. Requires completion of 10 continuing education hours (CEHs) plus a renewal application and fee. CEHs can be earned through NHA's online catalog, professional conferences, or approved provider programs.
ASCP PBT Recertification: Valid for 3 years. Requires 36 points through the ASCP BOC (Board of Certification) continuing education program. Points are earned through CE courses, publications, presentations, and professional activities.
Why Continuing Education Matters: Lab standards evolve. CLSI publishes updated guidelines for phlebotomy (currently GP41-A7). New safety devices replace old ones. New tests require new collection protocols. A phlebotomist certified in 2020 and who has done no continuing education may be unaware of updated order-of-draw recommendations, newer tube additive formulations, or revised safety device activation procedures.
Quick Knowledge Check
🎉 Complete Lesson 2
Great work! You're building the mindset of a professional phlebotomist.
🏥 Your Role in Patient Care
You are more than a technician. You are part of the patient's healthcare team — and often, the only person they interact with outside their room.

🔗 Where You Fit in the Healthcare Team
Healthcare is a team sport. A phlebotomist interacts with — and serves — a wide network of professionals, each with defined roles that intersect with yours:
| Professional | Their Role | Your Interaction |
|---|---|---|
| Physician / NP / PA | Diagnose, prescribe, order tests | You execute their lab orders. You never modify or interpret orders. |
| Registered Nurse | Patient care, medication, monitoring | Coordinate with RN for timing, patient access, IV status, fall risk alerts |
| Medical Lab Scientist (MLS) | Analyze specimens, report results | You collect; they analyze. Quality of your collection determines their result accuracy. |
| Pathologist | Supervise lab, interpret pathology | The physician who ultimately oversees your lab department. Reports upward through chain of command. |
| Lab Manager / Supervisor | Direct your daily workflow | Your immediate escalation point for difficult draws, patient complaints, equipment failures |
| Medical Assistant | Clinical and administrative support | In physician offices, MAs may also perform phlebotomy — your roles may overlap |
| Patient Care Tech | Vital signs, ADLs, patient transport | May alert you to patient condition changes, IV access issues |
A critical professional principle: stay in your lane. When a nurse asks "Can you check the patient's vitals while you're in there?" — that is not within phlebotomy scope. Decline politely and redirect: "That's outside my scope — I'll let the nursing team know."
🏥 Clinical Laboratory Departments & Test Categories
Understanding which department processes your specimens helps you prioritize and communicate correctly when critical results need immediate attention:
| Department | Key Tests | Turnaround Time (typical) |
|---|---|---|
| Chemistry / Metabolic | BMP, CMP, glucose, creatinine, electrolytes, troponin, liver enzymes | 30–60 min (stat: 15–30 min) |
| Hematology | CBC, differential, reticulocyte count | 15–30 min |
| Coagulation | PT/INR, PTT, fibrinogen, D-dimer | 30–60 min |
| Blood Bank | Type & Screen, crossmatch | 45–90 min (emergency O-neg available immediately) |
| Microbiology | Blood cultures (aerobic + anaerobic) | Incubation 24–120 hrs; preliminary 24–48 hrs |
| Urinalysis | Dipstick, microscopy, C&S | 30 min (dipstick); culture 24–48 hrs |
| Point-of-Care (POC) | Glucose, iStat, ABG, lactate, rapid strep, flu | 5–15 min — phlebotomist may perform these |
💬 Communication Protocols — Professionalism in Practice
Every patient interaction requires both verbal and nonverbal communication skills. Common scenarios and best-practice responses:
Patient refuses the draw: Never argue or pressure. Acknowledge the refusal calmly: "That's your right. I'll let your nurse and doctor know." Document the refusal in the chart per facility policy. A witnessed refusal is legally protected — never document that a draw occurred if the patient refused.
Patient asks about their diagnosis: "Your physician will review your results and discuss them with you. Is there anything I can do to make you more comfortable for the draw?"
Patient is in pain or upset: Pause. Acknowledge: "I can see you're uncomfortable. Let's take a moment." Proceed only when the patient is ready. Never rush through a draw on a distressed patient — it leads to movement during puncture and injury.
Language barrier: Use your facility's interpreter services — in-person interpreter, phone interpretation (Language Line), or video interpretation. Do not use family members as interpreters for clinical conversations involving test orders or diagnoses (HIPAA + accuracy concerns). Document interpreter use.
Reporting to nursing/physician: Use SBAR format — Situation, Background, Assessment, Recommendation. Example: "Room 412 patient refused CBC draw (S). She has a history of needle phobia and requested her nurse be present (B). She may agree to the draw with nursing support (A). Can you send someone to assist? (R)"
🤝 Interdisciplinary Collaboration & Chain of Command
Healthcare settings have defined reporting chains and collaboration expectations. Understanding yours prevents errors, resolves conflicts, and protects you professionally.
Your Chain of Command (typical hospital setting):
Phlebotomist → Lead Phlebotomist / Lab Supervisor → Lab Manager → Medical Director (Pathologist)
Escalation triggers:
- Patient condition deteriorates during draw (syncope, seizure, cardiac event) → call nursing/rapid response immediately
- Unable to collect specimen after 2 attempts → escalate to lead phlebotomist, document in chart
- Suspected specimen mislabeling or near-miss error → report immediately per your facility's error reporting policy (most use electronic incident reports)
- Patient complaint about conduct → involve supervisor, document facts objectively
- Equipment malfunction (centrifuge, transport system) → report to lab supervisor, follow backup protocol
Knowledge Check
🎉 Complete Lesson 3
You now understand your critical role in the patient care chain.
🔤 Medical Terminology & Abbreviations
Tap each card to reveal the definition. Master these — they appear constantly in lab orders, requisitions, and on the certification exam.
🔤 Root Words in Phlebotomy & Lab Medicine
Medical terminology is built from Latin and Greek roots. Mastering roots lets you decode unfamiliar terms on the fly:
| Root | Meaning | Example Term | Meaning |
|---|---|---|---|
| hemo- / hemato- | blood | hematology | study of blood |
| phlebo- | vein | phlebotomy | cutting/puncturing a vein |
| veno- | vein | venipuncture | puncturing a vein |
| artero- | artery | arterial blood gas | gas analysis from arterial blood |
| leuko- | white | leukocyte | white blood cell |
| erythro- | red | erythrocyte | red blood cell |
| thromb- | clot | thrombocyte | platelet (clot cell) |
| coagul- | clotting | coagulation | the clotting process |
| plasma- | liquid part of blood | plasmapheresis | removal of plasma |
| serum- | clear liquid after clotting | serology | study of serum antibodies |
| cyto- | cell | cytology | study of cells |
| anti- | against | anticoagulant | substance preventing clotting |
| hyper- | above/excessive | hyperglycemia | high blood sugar |
| hypo- | below/deficient | hypoglycemia | low blood sugar |
| -emia | condition of blood | anemia | insufficient RBCs/hemoglobin |
| -itis | inflammation | phlebitis | inflammation of a vein |
| -lysis | breakdown/destruction | hemolysis | destruction of red blood cells |
| -penia | deficiency | thrombocytopenia | low platelet count |
📋 Essential Lab Abbreviations — Mastery List
These abbreviations appear on lab requisitions, computer orders, and tube labels daily. Know them cold:
| Abbreviation | Full Name | What It Tests |
|---|---|---|
| CBC | Complete Blood Count | RBCs, WBCs, platelets, hemoglobin, hematocrit, differential |
| BMP | Basic Metabolic Panel | Na, K, Cl, CO2, BUN, creatinine, glucose, Ca |
| CMP | Comprehensive Metabolic Panel | BMP + liver enzymes (AST, ALT, ALP, bilirubin, albumin, total protein) |
| PT | Prothrombin Time | Extrinsic coagulation pathway (monitors warfarin) |
| PTT / aPTT | Partial Thromboplastin Time | Intrinsic coagulation pathway (monitors heparin) |
| INR | International Normalized Ratio | Standardized PT ratio; therapeutic range for warfarin: 2.0–3.0 |
| UA | Urinalysis | Urine glucose, protein, blood, pH, leukocytes, nitrites, specific gravity |
| HbA1c | Hemoglobin A1c | Average blood glucose over 2–3 months (diabetes monitoring) |
| BUN | Blood Urea Nitrogen | Kidney function (waste product clearance) |
| GFR/eGFR | Glomerular Filtration Rate | Calculated kidney filtration efficiency |
| TSH | Thyroid Stimulating Hormone | Thyroid function screening test |
| ABG | Arterial Blood Gas | pH, pO2, pCO2, HCO3 — respiratory/acid-base status |
| T&S | Type & Screen | Blood type (ABO/Rh) + antibody screen for transfusion preparation |
| ESR | Erythrocyte Sedimentation Rate | Non-specific inflammation marker |
| CRP | C-Reactive Protein | Acute inflammation marker; high-sensitivity version (hsCRP) for cardiac risk |
| PSA | Prostate-Specific Antigen | Prostate cancer screening; must not draw after prostate exam or biopsy |
| STD | Stat/Time-Defined | Order priority — Stat (ASAP), Routine, Timed |
🔡 Prefixes, Suffixes & Combining Forms
Combining forms are roots with a vowel connector (usually -o-) that join with other roots and suffixes to form compound terms:
| Prefix/Suffix | Meaning | Example |
|---|---|---|
| brady- | slow | bradycardia (slow heart rate) |
| tachy- | fast | tachycardia (fast heart rate) |
| poly- | many/much | polycythemia (excess RBCs) |
| mono- | one/single | monocyte (one-nucleus WBC) |
| -oscopy | visual examination | microscopy (examination via microscope) |
| -ology | study of | hematology, serology, microbiology |
| -ectomy | surgical removal | phlebectomy (vein removal) |
| -plasty | surgical repair | angioplasty |
| -gram/-graph | record/recording | electrocardiogram (ECG) |
| intra- | within | intravenous (within a vein) |
| sub- | below/under | subcutaneous (below the skin) |
| trans- | across/through | transfusion (across/into the bloodstream) |
Terminology Check
🎉 Complete Lesson 4
Flash cards mastered! You're speaking the language of the lab.
🧬 Blood Components
Blood is not just one substance — it is a complex tissue with four major components, each with critical functions.
🩸 Plasma — The Liquid Matrix of Blood
Plasma is the liquid portion of unclotted blood, comprising approximately 55% of total blood volume. It is a pale yellow fluid that remains when cellular components are removed. Plasma is obtained by centrifuging blood collected in a tube containing an anticoagulant (such as EDTA or sodium citrate) — the cells sink and plasma rises to the top.
Plasma composition:
- ~92% water — the transport medium for everything else
- ~7% proteins — albumin (maintains osmotic pressure), globulins (immune function), fibrinogen (clotting)
- ~1% other — glucose, electrolytes (Na⁺, K⁺, Cl⁻, Ca²⁺, HCO₃⁻), lipids, hormones, enzymes, waste products (urea, creatinine), clotting factors
Clinical relevance for phlebotomy: Tests like BMP, CMP, liver panel, lipid panel, and thyroid tests use serum (gold/SST tube). Coagulation tests (PT, PTT, INR) require plasma in a sodium citrate tube filled to exactly the fill line — because the test depends on a precise 9:1 blood-to-anticoagulant ratio.
🔴 Red Blood Cells (Erythrocytes) — Oxygen Transport
Red blood cells (RBCs) are the most numerous cells in blood — approximately 4.5–5.5 million per microliter in adults. They account for 45% of blood volume (the hematocrit).
Structure: RBCs are biconcave discs — the donut-ish shape maximizes surface area for gas exchange and allows the cells to deform and squeeze through capillaries smaller than their own diameter. Mature RBCs have no nucleus (the nucleus is expelled during maturation in bone marrow), which means they cannot replicate or repair themselves. Average lifespan: 120 days, then removed by the spleen.
Function: Hemoglobin, contained within RBCs, binds oxygen in the lungs (oxyhemoglobin) and releases it at tissues. Each hemoglobin molecule has 4 heme groups, each binding one O₂ molecule. RBCs also transport CO₂ back to the lungs, primarily as bicarbonate (HCO₃⁻) formed in the RBC.
Key lab values:
- Hemoglobin (Hgb): Normal 12–17.5 g/dL (lower in women, higher in men at altitude)
- Hematocrit (Hct): Normal 36–52%
- RBC count: 4.2–5.8 million/µL
- MCV (mean corpuscular volume): 80–100 fL — indicates cell size (microcytic = small, macrocytic = large)
⚪ White Blood Cells (Leukocytes) — Immune Defense
White blood cells (WBCs) are the immune system's mobile defense force. Normal WBC count: 4,500–11,000 per microliter. The differential count breaks WBCs into their five major subtypes:
| Cell Type | % of WBCs | Primary Function | Clinical Significance |
|---|---|---|---|
| Neutrophils | 50–70% | First responders — phagocytize bacteria | ↑ in bacterial infection, tissue damage; ↓ in chemo (neutropenia = infection risk) |
| Lymphocytes | 20–40% | T-cells (cellular immunity), B-cells (antibody production) | ↑ in viral infections (mono, COVID); ↑ dramatically in leukemia |
| Monocytes | 2–8% | Large phagocytes; become macrophages in tissue | ↑ in chronic infections, inflammatory disease |
| Eosinophils | 1–4% | Fight parasites; involved in allergic response | ↑ in allergies, asthma, parasitic infections |
| Basophils | <1% | Release histamine in allergic/inflammatory response | Rare elevation; seen in some leukemias |
Why phlebotomists need to know this: A patient with neutropenia (low neutrophils — ANC < 500) is severely immunocompromised. You must follow neutropenic precautions: mask, gloves, gown as required, and minimize any infection risk.
🟡 Platelets (Thrombocytes) — Hemostasis
Platelets are small, anucleate cell fragments (2–3 µm) produced by megakaryocytes in the bone marrow. Normal platelet count: 150,000–400,000 per microliter. Their primary role is primary hemostasis — the initial clot plug formation when a blood vessel is damaged.
Hemostasis sequence:
- Vascular spasm — vessel constricts immediately to reduce blood flow
- Platelet plug formation — platelets adhere to exposed collagen, activate, and aggregate to form a temporary plug
- Coagulation cascade — clotting factors activate in sequence (extrinsic or intrinsic pathway) to form fibrin, which reinforces the platelet plug into a stable clot
Tube relevance: The purple (EDTA) tube for CBC must be completely mixed — gently invert 8–10 times — to prevent platelet clumping, which can produce falsely low platelet counts. Inadequate mixing is one of the most common causes of CBC rejection.
🔬 Serum vs. Plasma — Critical Distinction
This distinction is tested on every phlebotomy certification exam and matters every day in specimen collection:
| Property | Serum | Plasma |
|---|---|---|
| Definition | Liquid portion AFTER blood has clotted | Liquid portion of anticoagulated blood |
| Contains fibrinogen? | No — consumed in clot formation | Yes — anticoagulant prevented clotting |
| Contains clotting factors? | No | Yes |
| Tube used | Gold (SST), Red (plain), Tiger-top | Light blue (citrate), Green (heparin), Purple (EDTA), Gray (fluoride/oxalate) |
| Process | Allow to clot 30 min, then centrifuge | Centrifuge directly (clotting prevented by additive) |
| Used for | Most chemistry, immunology, serology tests | Coagulation studies, some special chemistries, plasma glucose |
Blood Components Check
🎉 Complete Lesson 5
Blood components unlocked! You can now explain what you're collecting and why.
🅰️ Blood Groups — The ABO System
Blood typing is critical for transfusions. A mismatch can be fatal. Phlebotomists collect the crossmatch samples — so you must understand exactly what's at stake.
🅰️ ABO Blood Group System — Antigens & Antibodies
The ABO blood group system, discovered by Karl Landsteiner in 1901, is the most clinically important blood typing system. It determines transfusion compatibility and is central to blood bank operations.
The system works on two components:
- Antigens — proteins on the surface of RBCs (A antigens, B antigens, or both)
- Antibodies — proteins in the plasma that attack "foreign" antigens (anti-A, anti-B)
| Blood Type | RBC Antigens | Plasma Antibodies | Can Receive From | Can Donate To |
|---|---|---|---|---|
| Type A | A antigen | Anti-B | A, O | A, AB |
| Type B | B antigen | Anti-A | B, O | B, AB |
| Type AB | A and B antigens | None | A, B, AB, O (universal recipient) | AB only |
| Type O | Neither A nor B | Anti-A and Anti-B | O only | A, B, AB, O (universal donor) |
🔴 Rh Factor — Positive vs. Negative
The Rh (Rhesus) blood group system is the second most clinically significant. The D antigen is by far the most important in this system — its presence or absence is what "positive" and "negative" refer to:
- Rh-positive (Rh+): RBCs have the D antigen present. About 85% of the population is Rh+.
- Rh-negative (Rh-): No D antigen on RBCs. About 15% of the population is Rh-.
Unlike ABO antibodies (which are naturally present), Rh antibodies are immune-mediated — they only develop after exposure to the D antigen through transfusion or pregnancy.
Clinical significance in pregnancy (Hemolytic Disease of the Newborn):
If an Rh- mother carries an Rh+ fetus, some fetal blood may cross the placenta and sensitize the mother, causing her to produce anti-D antibodies. In subsequent pregnancies with Rh+ fetuses, these antibodies cross the placenta and destroy fetal RBCs — causing hemolytic disease of the newborn (HDN), which can be fatal. This is prevented with Rh immunoglobulin (RhoGAM) given to Rh- mothers during pregnancy and after delivery.
🔬 Crossmatch — Compatibility Before Transfusion
A crossmatch is the physical test performed before a blood transfusion to confirm that donor blood is compatible with the recipient's blood. It involves mixing donor RBCs with recipient plasma and looking for agglutination (clumping) or hemolysis.
Types of crossmatch:
- Immediate spin crossmatch: ABO compatibility check — fast (5 minutes), checks for major ABO incompatibility
- Electronic crossmatch: Computer verification of compatibility using previously established type and antibody screen — no physical testing, fastest method
- Full serologic crossmatch: Incubation at 37°C + antihuman globulin phase — detects unexpected antibodies; required when antibody screen is positive or patient history is complex
Phlebotomist's role in blood bank specimens: Type & Screen and crossmatch specimens are among the most tightly regulated in the lab. Require two independent patient identifications. Most facilities require the phlebotomist to label the tube at the bedside with their initials, collection time, and date. Some facilities require a second phlebotomist to witness and co-sign. Pre-labeled or pre-filled tubes are NEVER acceptable for blood bank specimens.
ABO Knowledge Check
🎉 Complete Lesson 6
➕➖ ABO vs. Rh Blood Groups
The Rh factor adds a second critical layer to blood typing. Together with ABO, it defines the 8 major blood types you'll encounter in clinical practice.
💪 Antecubital Fossa Anatomy — Primary Draw Site
The antecubital fossa is the triangular depression on the front (anterior) surface of the elbow — the most common site for venipuncture. Three major veins traverse this area, listed in preferred order:
| Vein | Location | Preference | Characteristics |
|---|---|---|---|
| Median Cubital | Center of antecubital fossa, runs diagonally | 🥇 First choice | Large, well-anchored, less mobile, usually superficial, not near major nerve or artery |
| Cephalic | Lateral (thumb side) of forearm and antecubital fossa | 🥈 Second choice | Slightly more mobile, tends to "roll," may be smaller in some patients but still accessible |
| Basilic | Medial (pinky side) of antecubital fossa | 🥉 Third choice — use with caution | Near brachial artery and median nerve — risk of arterial puncture and nerve damage; more painful |
Anatomy landmarks: The brachial artery runs along the medial aspect of the antecubital fossa, lateral to the basilic vein. The median nerve runs close to the basilic vein. Accidental arterial puncture (recognizable by bright red blood pulsing rapidly into the tube) requires immediate withdrawal, prolonged pressure (minimum 5 minutes), and incident documentation.
🦵 Alternative Draw Sites — When the Antecubital Fails
When antecubital veins are unavailable (multiple prior attempts, infiltrated IVs, surgical restrictions, mastectomy on that side), move to alternative sites:
| Alternative Site | Considerations | Special Requirements |
|---|---|---|
| Forearm veins | Median antebrachial, accessory cephalic — smaller but accessible | Use smaller gauge (23G); apply tourniquet more distally |
| Hand dorsum veins | Metacarpal veins — visible but small and more painful | 23G butterfly recommended; butterfly for short connection to tube |
| Wrist veins | Generally avoided — near radial artery and tendons; painful | Use only when no other option; proceed carefully |
| Ankle/foot | Last resort in most facilities; contraindicated in diabetics (poor wound healing) | Physician order required at many facilities; high infection risk |
| Capillary (fingerstick) | Lateral finger pad (adults); posterior heel (neonates); for POC tests and small volumes | Do NOT use index finger (most sensitive) or thumb; use 3rd or 4th finger lateral tip |
🩹 Vein Selection & Assessment — What to Look For
Before inserting a needle, assess the vein with palpation (not just visualization). A good venipuncture candidate should feel:
- Bouncy/resilient under finger pressure — indicates good volume and elasticity
- Soft (not hard/fibrous, which indicates sclerosis from prior draws)
- Straight — easier to cannulate than curved or branching veins
- Well-anchored — less likely to roll away from needle tip
- Accessible — close enough to surface to enter at 15–30° angle
Vein conditions to avoid or handle carefully:
- Sclerosed veins (hard, cordlike): Damaged from repeated punctures or prior IV infusion. Poor choice — collapse easily, high failure rate.
- Rolling veins: Mobile when you push on them. Anchor by pulling skin taut below the site before inserting needle.
- Deep veins: Not palpable until tourniquet applied, then barely. Use a 1.5" needle, steeper angle if needed; butterfly setup for better control.
- Fragile/elderly veins: Thin walls, collapse under standard vacuum. Use a syringe or butterfly with smaller gauge (23G); release tourniquet as soon as blood flows.
⏱️ Tourniquet Application — Technique & Timing
The tourniquet is applied 3–4 inches above the venipuncture site to distend the vein by temporarily restricting venous return.
Technique:
- Cross the latex/stretch material over the patient's arm
- Tuck one end under to create a quick-release knot
- Tighten until veins distend — tight enough to restrict venous flow but NOT arterial flow (patient should still feel their pulse)
- Ask patient to make a fist (once — pumping repeatedly alters K⁺ and other values)
Timing: Tourniquet must be released within 1 minute of application. Leaving it on longer causes hemoconcentration — fluid exits the vascular space into tissue, artificially elevating protein-bound substances, blood cells, and other analytes. This produces falsely elevated values for: potassium, calcium, protein, cholesterol, and hematocrit.
Rh Factor Check
🎉 Complete Lesson 7
❤️ Cardiovascular Anatomy
You collect blood from veins. Understanding exactly how the cardiovascular system works makes you a more effective, safer phlebotomist.
🔄 The Coagulation Cascade — Pathways Explained
The coagulation cascade is a series of biochemical reactions where "clotting factors" (numbered I–XIII, with some gaps) activate each other in sequence, ultimately forming a fibrin clot to stop bleeding. The cascade has two entry pathways that converge on a common final pathway:
Extrinsic Pathway (faster — seconds to minutes):
Triggered by tissue factor (TF, Factor III) released from damaged tissue outside the blood vessel. TF combines with Factor VII to activate Factor X. This is the main pathway active when a vessel is injured.
Intrinsic Pathway (slower — minutes):
Triggered by blood contacting a foreign surface (glass, collagen). Factors XII → XI → IX → VIII → X are activated in sequence. This pathway is tested by the PTT.
Common Pathway:
Both pathways converge at Factor X. Factor X + Factor V → prothrombinase complex → converts prothrombin (Factor II) → thrombin → converts fibrinogen (Factor I) → fibrin → cross-linked fibrin clot (Factor XIII stabilizes)
Anticoagulants and which pathway they affect:
- Warfarin (Coumadin): Inhibits Vitamin K-dependent factors (II, VII, IX, X, Protein C, S). Monitored with PT/INR (extrinsic pathway).
- Heparin (UFH): Enhances antithrombin III activity → inhibits thrombin and Factor Xa. Monitored with PTT (intrinsic pathway).
- Low Molecular Weight Heparin (LMWH — Lovenox): Primarily inhibits Factor Xa. Monitored with anti-Xa assay, NOT PTT.
- Direct Oral Anticoagulants (DOACs — Xarelto, Eliquis, Pradaxa): Target specific factors directly. Not routinely monitored with standard coag tests.
📊 PT, PTT, and INR — What They Measure & Why They Matter
These three tests are the core coagulation lab panel, and understanding them helps you handle the specimens correctly:
| Test | Full Name | Pathway Tested | Normal Range | Clinical Use |
|---|---|---|---|---|
| PT | Prothrombin Time | Extrinsic + common (Factors VII, X, V, II, I) | 11–13 seconds | Warfarin monitoring; liver disease; pre-surgical screening |
| INR | International Normalized Ratio | Derived from PT (normalized) | 0.8–1.2 (normal); 2.0–3.0 (therapeutic warfarin); 2.5–3.5 (mechanical heart valves) | Standardizes PT across different labs/reagents for warfarin monitoring |
| PTT / aPTT | Partial Thromboplastin Time (activated) | Intrinsic + common (XII, XI, IX, VIII, X, V, II, I) | 25–35 seconds | Heparin monitoring; hemophilia A/B screening; lupus anticoagulant |
Why INR exists: Different labs use different thromboplastin reagents for PT testing, and they have different sensitivities. A PT of 20 seconds at Lab A might not equal 20 seconds at Lab B. The INR formula normalizes this: INR = (Patient PT / Mean Normal PT)^ISI, where ISI is the International Sensitivity Index of the reagent. This makes warfarin monitoring comparable worldwide.
⏱️ Timed Draws & Therapeutic Drug Monitoring
Some specimens must be collected at precise times to produce valid results. This is where understanding clinical context directly affects specimen quality:
Warfarin (INR) draws: Can be drawn at any time — INR reflects a steady-state effect. But if the patient just took their dose or missed a dose, the prescribing provider needs to know this when interpreting results.
Heparin (PTT) draws: If drawn too soon after a dose adjustment, the result won't reflect the actual therapeutic level. Standard practice: draw 6 hours after any dose change, or at the time specified by the physician order.
Fasting glucose / lipid panel: Patient must fast 8–12 hours (water is acceptable). Document fasting status on the requisition. A non-fasting lipid panel is inaccurate — triglycerides can be 200–500 mg/dL higher in the fed state.
Cortisol: Has a strong diurnal rhythm — highest at 8am, lowest at midnight. Draw time must be documented and compared to reference ranges for that time of day.
Blood cultures: Ideally collected before antibiotics are started. Two sets from two different sites (to distinguish true bacteremia from skin contamination). If a patient is already on antibiotics, document this — labs will attempt to recover organisms from "antibiotic-neutralizing" culture bottles.
Digoxin: Must be drawn 8 hours after last dose (or just before the next dose) — the "trough" level. Drawing too soon after a dose produces a falsely elevated level.
Therapeutic drug levels (general):
- Peak level: Drawn at the highest expected concentration (timing depends on drug and route — typically 1–2 hours after IV infusion completes)
- Trough level: Drawn just before the next dose (lowest concentration) — most relevant for toxicity monitoring
Anatomy Check
🎉 Complete Lesson 8
💓 Cardiovascular Physiology & Blood Flow
The final piece: how blood moves through the body and how the heart's electrical and mechanical systems work together.
🔄 Pulmonary vs. Systemic Circulation
🫁 Pulmonary Circulation
Right side of heart → Pulmonary artery → Lungs → Gas exchange (CO₂ out / O₂ in) → Pulmonary veins → Left atrium
Short loop — low pressure
🌍 Systemic Circulation
Left ventricle → Aorta → Body tissues → Delivers O₂, picks up CO₂ → Superior/Inferior Vena Cava → Right atrium
Long loop — higher pressure
The veins you draw from are part of the systemic venous return — carrying deoxygenated blood back to the heart. This is why venous blood is used for most lab tests (it reflects systemic metabolism).
📊 Vital Signs You Should Know
| Vital Sign | Normal Adult Range | Why Phlebotomists Care |
|---|---|---|
| Blood Pressure | 90–120 / 60–80 mmHg | Hypotension → fainting risk during draw |
| Heart Rate | 60–100 bpm | Tachycardia → possible vasovagal reaction |
| Hemoglobin | 12–17.5 g/dL | Low Hgb = anemia; consider max draw volume |
| Hematocrit | 36–52% | Measures % of blood that is RBCs |
Module 1 Final Check
🏅 Complete Module 1!
You've mastered Phlebotomy Fundamentals. Earn your Blood Runner Badge and unlock Module 2!
Module 1 Mastery Quiz
Test your understanding with 20 questions on the topics covered in this module.