Blood Cultures — The Gold Standard for Sepsis
Blood culture collection is the highest-stakes phlebotomy procedure. A contaminated culture sends a patient on days of unnecessary antibiotics. A missed true positive is life-threatening.
🦠 Why Blood Cultures Matter
Blood cultures detect bacteria and fungi circulating in the bloodstream — a condition called bacteremia or fungemia. When infection is uncontrolled and causes systemic inflammation, it becomes sepsis — one of the leading causes of in-hospital death.
- Blood cultures must be collected BEFORE starting antibiotic therapy whenever possible
- Antibiotics rapidly suppress bacterial growth, making cultures false-negative
- 2 sets (4 bottles) from 2 separate sites is the global standard for optimal sensitivity
🧪 Aerobic vs. Anaerobic Bottles
Aerobic Bottle
Contains O₂ — grows oxygen-requiring organisms (Staph, Strep, E. coli, Klebsiella). Fill first — provides more accurate quantification.
Anaerobic Bottle
No O₂ — grows obligate anaerobes (Bacteroides, Clostridium). Fill second. Crucial for abdominal, wound, and dental infection sources.
🔬 Blood Culture Collection — Step by Step
- Gather 4 bottles (2 sets × aerobic + anaerobic)Label each bottle with patient info, date/time, site (Left AC, Right AC), and bottle sequence.
- Disinfect bottle tops with 70% IPAWipe each rubber septum with a fresh IPA swab and allow to dry. This is often forgotten — don't skip it.
- Clean the venipuncture site — 2-step protocolIPA (30–60 sec dry), then CHG 2% or povidone-iodine (60–90 sec dry). Do not touch the site after this point.
- Perform venipuncture and fill aerobic bottle firstUse a dedicated blood culture collection set. Fill aerobic to the 8–10 mL line (use the fill indicator on the bottle).
- Fill anaerobic bottle secondWithout removing the needle from the patient, change collection to the anaerobic bottle.
- Repeat at a different anatomical site for the second setSeparate site = separate skin flora. This distinguishes true bacteremia from contamination.
- Label immediately, transport to lab at body temperatureNever refrigerate blood cultures. Transport to the incubator promptly.
🦠 Bacteremia vs. Sepsis — Clinical Context for Blood Cultures
Blood culture is ordered when a patient shows signs of bloodstream infection (bacteremia) or sepsis. Understanding the clinical picture helps you prioritize stat orders and handle specimens appropriately.
Bacteremia: Bacteria present in the bloodstream, confirmed by positive blood culture. May be transient (brief entry of bacteria into blood from another site) or persistent (ongoing infection — endocarditis, infected IV catheter, abscess).
Sepsis: Life-threatening organ dysfunction caused by dysregulated host response to infection. 2016 Sepsis-3 criteria: SOFA score ≥2 due to presumed infection. Septic shock: sepsis + vasopressor requirement + lactate >2 mmol/L.
How you affect sepsis outcomes:
- Draw before antibiotics: If antibiotics have already been given, some organisms may not grow. You cannot change this — but documenting antibiotic status tells the lab to use specialty culture bottles that neutralize antibiotic effects.
- Two-site collection: Most guidelines require two sets (aerobic + anaerobic) from two different sites. This is not redundant — it distinguishes true bacteremia (both sites positive) from skin contamination (only one site positive with a skin commensal).
- Contamination prevention: A contaminated blood culture sends a sepsis patient through a 3–5 day false workup on antibiotics for coagulase-negative Staph — bacteria that almost certainly came from your skin prep failure.
📝 Knowledge Check
Blood Smears — The Microscopic Window
A peripheral blood smear is a thin film of blood on a glass slide, stained so the hematologist or pathologist can see individual blood cell morphology. You are responsible for making a quality smear at the bedside.

🔬 When Blood Smears Are Ordered
- Suspected malaria, sickle cell disease, or hemolytic anemia
- Abnormal CBC flags (abnormal WBC differential, blast cells, platelet clumping)
- Evaluation of leukemia or lymphoma
- Monitoring chemotherapy response
- Post-splenectomy follow-up
- Transfusion reactions
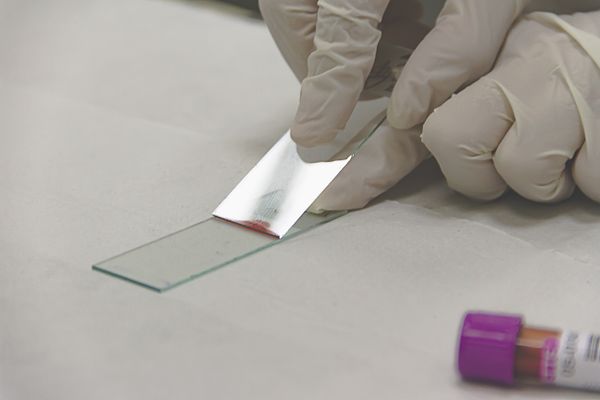
📋 Making a Wedge Smear — Technique
- Collect a fingerstick or use fresh EDTA (lavender) bloodSmears must be made from fresh blood. EDTA blood must be smeared within 1 hour of collection — EDTA causes morphology changes after this time.
- Place a small drop (2–3 µL) near one end of a clean glass slideToo large a drop = thick smear; too small = incomplete feathered edge. The drop should be about the size of a sesame seed.
- Rest the spreader slide at 30–45° angle, touching the dropAllow the blood to spread along the width of the spreader slide by capillary action before pushing forward.
- Push the spreader forward in one smooth, rapid strokeMaintain constant pressure and angle throughout the stroke. Hesitation creates ridges and uneven thickness.
- The smear should show a "feathered edge"The thin end (feathered edge) is where cells are in a single layer — ideal for differential counting.
- Label and allow to air-dry completelyDo not blow dry or heat. Label at the thick end. Protect from dust during drying.
🧠 Smear Flashcards
Tap to flip
🔬 Blood Smear Quality — What Hematologists Need From You
The quality of a blood smear depends entirely on the technique used during preparation. A thick smear, a smear with thick edges, or a smear with waves and holes prevents accurate cell morphology assessment and differential count.
The physics of a good wedge smear: When a spreader slide is drawn across a drop of blood at 30–45°, a feathered edge is created where blood cells are spread into a thin monolayer. The goal is a zone in the middle of the slide where cells are one cell deep — not overlapping, not too spread apart.
Variables that affect smear quality:
- Drop size: Too large = thick smear; too small = too short. Standard: 1–2 mm diameter drop placed at the frosted end of the slide
- Spreader angle: Higher angle (45°) → shorter, thicker smear. Lower angle (25°) → longer, thinner smear. For patients with high Hgb/polycythemia, use lower angle. For anemia, higher angle.
- Spreading speed: Too slow = thick with irregular edges. Move the spreader smoothly and at a consistent pace.
- EDTA tube standing time: Blood smears should be made within 1 hour of collection from EDTA tubes. Prolonged standing causes neutrophil nuclear distortion and platelet satellitism (pseudothrombocytopenia).
📝 Knowledge Check
Newborn Screening — The PKU Card
Every newborn in the U.S. is screened for dozens of metabolic, genetic, and endocrine disorders within days of birth. The phlebotomist's technique directly affects whether these life-saving tests are valid.
👶 What Is Newborn Screening?
Mandated by state law, newborn screening (NBS) uses dried blood spots (DBS) collected on a specially designed filter paper card to test for conditions including:
- Phenylketonuria (PKU) — inability to metabolize phenylalanine → brain damage if untreated
- Congenital hypothyroidism — thyroid hormone deficiency → intellectual disability if untreated
- Sickle cell disease and other hemoglobinopathies
- Cystic fibrosis (CF)
- Galactosemia, MCAD deficiency, and 30+ other metabolic disorders (varies by state)
📋 NBS Collection — Critical Technique Requirements
- Timing: 24–72 hours after birthToo early (< 24 hrs) — metabolic abnormalities haven't had time to accumulate. State programs may require a repeat screen at 1–2 weeks for early births.
- Heel stick only — lateral or medial plantar surfaceMaximum 2.0 mm depth. Never the posterior heel (bone risk). Warm the heel for 3–5 minutes before puncture.
- Wipe away the first dropSame rule as all capillary collections — discard the first drop (contains tissue fluid).
- Touch the filter paper circle to the blood drop — ONE TOUCH PER CIRCLEAllow the blood to soak through the filter paper from one side only. Do NOT press the paper to the skin — this causes layering artifacts.
- Fill each circle completely in ONE applicationEach circle must be completely filled — a partially filled circle is an invalid specimen and will be rejected. Do not add blood to a partially filled circle from a second drop.
- Air-dry flat for at least 3 hours before mailingDo NOT stack wet cards. Lay flat at room temperature. Do not heat dry or expose to sunlight. Do not refrigerate wet cards.
👶 Conditions Detected by Newborn Screening
Newborn screening programs test for metabolic, endocrine, and other disorders that are treatable if identified before symptoms appear. The ACMG (American College of Medical Genetics) Recommended Uniform Screening Panel (RUSP) includes 35+ core conditions and 26+ secondary conditions.
Key conditions screened (examples):
- PKU (Phenylketonuria): Inability to metabolize phenylalanine → brain damage. Diet modification from birth prevents damage completely.
- Congenital hypothyroidism: Absent/deficient thyroid hormone → intellectual disability. Thyroid hormone replacement prevents developmental delay.
- Sickle cell disease: Abnormal hemoglobin → pain crises, organ damage. Early identification allows prophylactic antibiotics (dramatically reduces childhood mortality) and parental education.
- Cystic fibrosis: CFTR gene mutation → chronic lung/GI disease. Early identification enables aggressive treatment that extends life expectancy.
- SCID (Severe Combined Immunodeficiency): No functional immune cells → fatal infections. SCID is curable with bone marrow transplant if identified before first infection.
Why the first drop is discarded: The first blood drop from a heelstick contains tissue fluid and interstitial fluid from the puncture trauma — this dilutes the blood and may cause invalid NBS results. The blood must flow freely before you apply it to the filter paper circles.
The filter paper must be completely filled: Each circle on the NBS card requires blood to soak through the entire circle on both sides. Under-filled circles are the most common reason for NBS card rejection and recollection.
📝 Knowledge Check
Arterial Blood Gas (ABG) — Scope Awareness
ABG collection is typically performed by respiratory therapists or specially trained nurses — but phlebotomists must understand the procedure, specimen handling, and their own scope of practice regarding it.
🫁 What ABGs Measure
Arterial blood gas analysis directly measures oxygen delivery and CO₂ removal from the lungs — critical for assessing respiratory failure, acid-base disorders, and ventilator management.
| Parameter | Normal Range | Clinical Meaning |
|---|---|---|
| pH | 7.35–7.45 | Overall acid-base balance (< 7.35 = acidosis; > 7.45 = alkalosis) |
| PaO₂ | 80–100 mmHg | Oxygen dissolved in arterial blood |
| PaCO₂ | 35–45 mmHg | CO₂ in arterial blood — reflects ventilation |
| HCO₃⁻ | 22–26 mEq/L | Bicarbonate — metabolic component of acid-base |
| SaO₂ | 95–100% | Oxygen saturation of hemoglobin |
🩸 ABG Site — Radial Artery First
- Radial artery (wrist) — first choice: superficial, easily palpated, collateral circulation from ulnar artery
- Brachial artery — second choice: less collateral circulation, higher complication risk
- Femoral artery — last resort: large vessel, used in emergencies
🧊 ABG Specimen Handling
- Collected in a pre-heparinized syringe (prevents clotting)
- Expel all air bubbles immediately — air equilibrates O₂/CO₂ levels, falsifying results
- Cap the syringe immediately after collection
- Transport on ice if analysis will take more than 15 minutes — cooling stops cellular metabolism that consumes O₂ and produces CO₂
- Analyze within 15 minutes (room temp) or 60 minutes (on ice)
- Label with patient ID, date/time, FiO₂ (fraction of inspired O₂ the patient is breathing), and patient temperature
🫁 ABG Interpretation Basics — What Phlebotomists Should Understand
While phlebotomists do not interpret ABG results (this is physician/respiratory therapy scope), understanding what ABGs measure helps you prioritize specimens, handle them correctly, and communicate with the care team.
The four primary ABG parameters:
| Parameter | Normal Range | Measures | If Abnormal |
|---|---|---|---|
| pH | 7.35–7.45 | Blood acidity/alkalinity | <7.35 = acidosis; >7.45 = alkalosis |
| PaO₂ | 80–100 mmHg | Dissolved oxygen in arterial blood | <80 = hypoxemia; <60 = severe |
| PaCO₂ | 35–45 mmHg | CO₂ (respiratory acid) | >45 = hypoventilation; <35 = hyperventilation |
| HCO₃⁻ | 22–26 mEq/L | Bicarbonate (metabolic base) | Altered in metabolic disorders and compensation |
Why ABGs are stat — always: pH < 7.2 or > 7.6 is life-threatening. PaO₂ < 60 mmHg requires immediate intervention. There is no such thing as a routine ABG — they are always clinically urgent. Transport on ice, within 15–30 minutes of collection, to maintain gas stability.
Modified Allen Test: Before radial artery puncture, perform the Modified Allen Test to confirm adequate ulnar collateral circulation. If the test is negative (palmar arch inadequate), the radial artery should not be used — go to the brachial artery per physician order, or recommend a different site.
📝 Knowledge Check
Glucose Tolerance Testing (GTT)
GTT is a multi-draw, timed collection — your patient coordination and timing precision directly determine whether the test is valid. One missed draw or a late collection invalidates hours of fasting.
🍬 What is GTT?
The Oral Glucose Tolerance Test (OGTT) measures how well the body processes a standardized glucose load over time. It is used to diagnose:
- Type 2 Diabetes — 2-hour OGTT with 75g glucose
- Gestational Diabetes (GDM) — 3-hour OGTT with 100g glucose (most common reason in phlebotomy)
- Pre-diabetes / Impaired Glucose Tolerance
⏱️ GTT Draw Schedule — 3-Hour Protocol (GDM Diagnosis)
| Time Point | What Happens | Draw Tube | Timing Precision |
|---|---|---|---|
| T = 0 (Fasting) | Fasting blood draw after 8–12 hr fast | Gray top (fluoride) | Exact — this is the baseline |
| 0 → 5 min | Patient drinks 100g glucose solution | — | Patient must drink within 5 min |
| T = 60 min | 1-hour post-load draw | Gray top | ±5 minutes of exact time |
| T = 120 min | 2-hour post-load draw | Gray top | ±5 minutes of exact time |
| T = 180 min | 3-hour post-load draw | Gray top | ±5 minutes of exact time |
📋 Patient Instructions During GTT
- Remain seated or lying down — physical activity raises glucose uptake and lowers readings
- No food, drink (except water), or gum during the test
- No smoking during the test — nicotine affects glucose metabolism
- Communicate any nausea immediately — vomiting terminates the test
- Document all draw times exactly as performed (not scheduled)
🍬 Glucose Tolerance Test Protocols — 1-Hour vs. 3-Hour
Glucose tolerance testing is one of the most time-intensive procedures in outpatient phlebotomy. Understanding both protocols prevents errors that require restarting the entire test:
1-Hour Glucose Challenge Test (GCT) — Gestational Diabetes Screening:
- Patient does NOT need to fast — the screen is designed to work fed or fasting
- Drink 50g glucose solution in 5 minutes
- Draw venous blood exactly 1 hour after the glucose drink
- Threshold: <130 mg/dL = negative. ≥130 mg/dL (or ≥140 in some protocols) = proceed to 3-hour diagnostic GTT
3-Hour Oral GTT (OGTT) — Gestational Diabetes Diagnosis:
- Patient MUST fast 8–12 hours
- Fasting draw (T=0)
- Patient drinks 100g glucose solution in 5 minutes
- Draw at 1 hour (T=60)
- Draw at 2 hours (T=120)
- Draw at 3 hours (T=180)
During the test — patient instructions are critical:
- Patient must remain seated — physical activity significantly lowers glucose, invalidating the test
- No food, juice, or other beverages — water only
- No smoking — nicotine affects glucose metabolism
- If patient vomits the glucose solution: test is invalid — must reschedule
- If patient faints or feels severely symptomatic: test is aborted, notify physician
Why timing must be precise: Each draw is timed from when the patient finished the glucose drink, not when they started. A 5-minute error in any draw time can invalidate the curve interpretation. Document exact drink finish time on the requisition.
📝 Knowledge Check
Pediatric Collections & Minimum Volume
Iatrogenic anemia — anemia caused by excessive blood draws — is a real and preventable harm in hospitalized patients, especially premature infants. Every milliliter drawn must be justified.
🩸 Iatrogenic Anemia — A Hidden Patient Safety Issue
Iatrogenic anemia results from laboratory blood draws removing more blood than the patient can replenish. It is especially dangerous in:
- Premature and term neonates (total blood volume ~85–100 mL/kg)
- Critically ill ICU patients (often drawn 40–70 mL per day)
- Pediatric patients with small total blood volumes
- Patients with pre-existing anemia
📊 Pediatric Blood Volume Reference
| Patient | Approx. Blood Volume | Safe Draw Limit (10%) |
|---|---|---|
| Premature neonate (1 kg) | 85–100 mL | ~8–10 mL total per 24 hrs |
| Full-term neonate (3 kg) | 255–300 mL | ~25–30 mL |
| Infant (5 kg) | ~400 mL | ~40 mL |
| Child 20 kg | ~1,600 mL | ~160 mL |
| Adult (70 kg) | ~5,000 mL | ~500 mL |
🛡️ Blood Conservation Strategies
- Batch testing: Coordinate multiple ordered tests into a single draw when possible
- Micro-collection tubes: Use 100–500 µL pediatric tubes instead of adult vacuum tubes where the lab can validate
- Point-of-care testing: i-STAT and similar bedside analyzers use <1 mL for multiple tests
- Challenge unnecessary orders: Ask if every ordered test is clinically necessary — phlebotomists can be patient advocates
- Discard volume awareness: When drawing from central lines, minimize the waste (discard) volume used to clear the line
- Documentation: Track cumulative draw volumes in the chart for high-risk patients
🩸 Minimum Necessary Volume — The Math That Protects Patients
Iatrogenic anemia (anemia caused by medical treatment, specifically blood draws) is a recognized patient safety issue in hospitals, particularly in ICUs and neonatal units where daily phlebotomy volume can be substantial.
The scale of the problem: ICU patients can have 40–70 mL of blood drawn per day from routine labs. A 70 kg adult has approximately 5,600 mL of total blood volume — so daily ICU draws represent about 1% of total blood volume daily. Over a 2-week ICU stay, cumulative draws of 600–1,000 mL are common. Many ICU patients receive transfusions specifically because of phlebotomy-induced anemia.
What phlebotomists can do:
- Use small-volume pediatric tubes for adult patients whenever possible — many routine tests can be performed from microtainer volumes
- Avoid waste tubes when not required — question whether the discard tube is truly necessary for each draw
- Consolidate draws — if a patient has multiple orders throughout the day, check with the care team about batching draws to reduce total venipuncture events
- Avoid IV line sampling waste — when drawing from central lines, the standard 5–10 mL discard volume is often excessive; closed-loop systems that return the discard reduce total loss
- Document volume collected — especially in pediatric and neonatal patients. Most facilities have volume tracking systems for high-risk patients.
| Patient Weight | Estimated Total Blood Volume | Max Draw/Procedure | Max Draw/Month |
|---|---|---|---|
| Premature (<1 kg) | 90–105 mL/kg = 90–105 mL | 0.5–1 mL | 2.3–2.5 mL |
| Neonate (3.5 kg) | 80–90 mL/kg = 280–315 mL | 2.5–3 mL | 8–9 mL |
| Child 10 kg | 75–80 mL/kg = 750–800 mL | 7–8 mL | 24 mL |
| Adult 70 kg | ~5,600 mL | ~450 mL acute | No standard limit but track in ICU |
📝 Knowledge Check
Clinical Scenarios: Special Collections
Week 3 clinicals are almost here. These scenarios test your ability to apply special collection knowledge under real-world pressure.
🏥 Special Collection Scenarios
Scenario 1: Pre-Antibiotic Blood Cultures
A patient presents with fever (38.9°C), chills, and hypotension. The physician orders blood cultures × 2 sets AND immediately starts IV vancomycin. By the time you arrive, the first bag of vancomycin is already running. What is the correct action?
Scenario 2: The GTT Timing Problem
You started a 3-hour GTT at 8:00 AM. The patient drank the glucose solution at 8:05 AM. Your 1-hour draw was supposed to be at 9:05 AM, but you got called away to an emergency and arrived at 9:22 AM. The patient is still seated and has not eaten or moved. What do you do?
Scenario 3: The NBS Rejection
The state NBS lab calls to say a newborn's filter paper card was rejected — the circles appear to have layered blood (multiple applications visible). The infant is now 5 days old and has been discharged home. What happens next?
Scenario 4: Premature Infant Cumulative Draws
You are about to draw 6 mL of blood from a 900-gram premature infant in the NICU. You notice in the chart that 5 mL was already drawn this morning for a metabolic panel. The total blood volume for this infant is estimated at 76 mL.
Module 5 Mastery Quiz
Test your understanding with 20 questions on the topics covered in this module.